
This post is brought to you in partnership with our friends at Cuez. Cuez Automator is a no-code, cloud-based studio automation tool, giving you control over playout, graphics, and devices via modern APIs. Get a demo to see it in action today.
Compared to 10 years ago the automated control room is now a reality.
Learning to manually run a show with vMix, TriCaster, or a big switcher is a daunting task. When I helped launch Night Light with Albert Lawrence, a live social shopping podcast, I dove into vMix the way most solo producers do—late nights, too many tabs, and a notebook full of macros. Switching cameras while riding audio, animating graphics while cueing bumpers, reordering elements on the fly while watching clock and comments—there’s a reason why it can take whole teams for this. On a show like Night Light, a pilot live-stream aiming bring fun, interactivity and production values into live social shopping, a whole team was simply not in the budget.
I had one big advantage, 15+ years of live television experience, in fact, I was able to run the show manually, using vMix, my Streamdeck and a small x-Touch audio control surface (this should sound familiar to a lot of streamers). However, that left me thinking…can someone brand new to live streaming really do a show like this? Can a company, that does not employ production pros supposed to accomplish something similar? The answer was pretty obvious…no…not without a lot of practice or training.
That led me to think, what if there were a better way, at a fraction of the cost of big-iron production automation? That question pushed me to try Cuez Automator. I was looking for something that made the rundown itself drive the show, so I could spend less energy juggling buttons and more energy producing a good show. What follows is a concept I created with Cuez Automator, to mostly automate the production of Night Light, and why it changed how I think about building both a live newscast or podcast.
Cuez Rundown + Automator
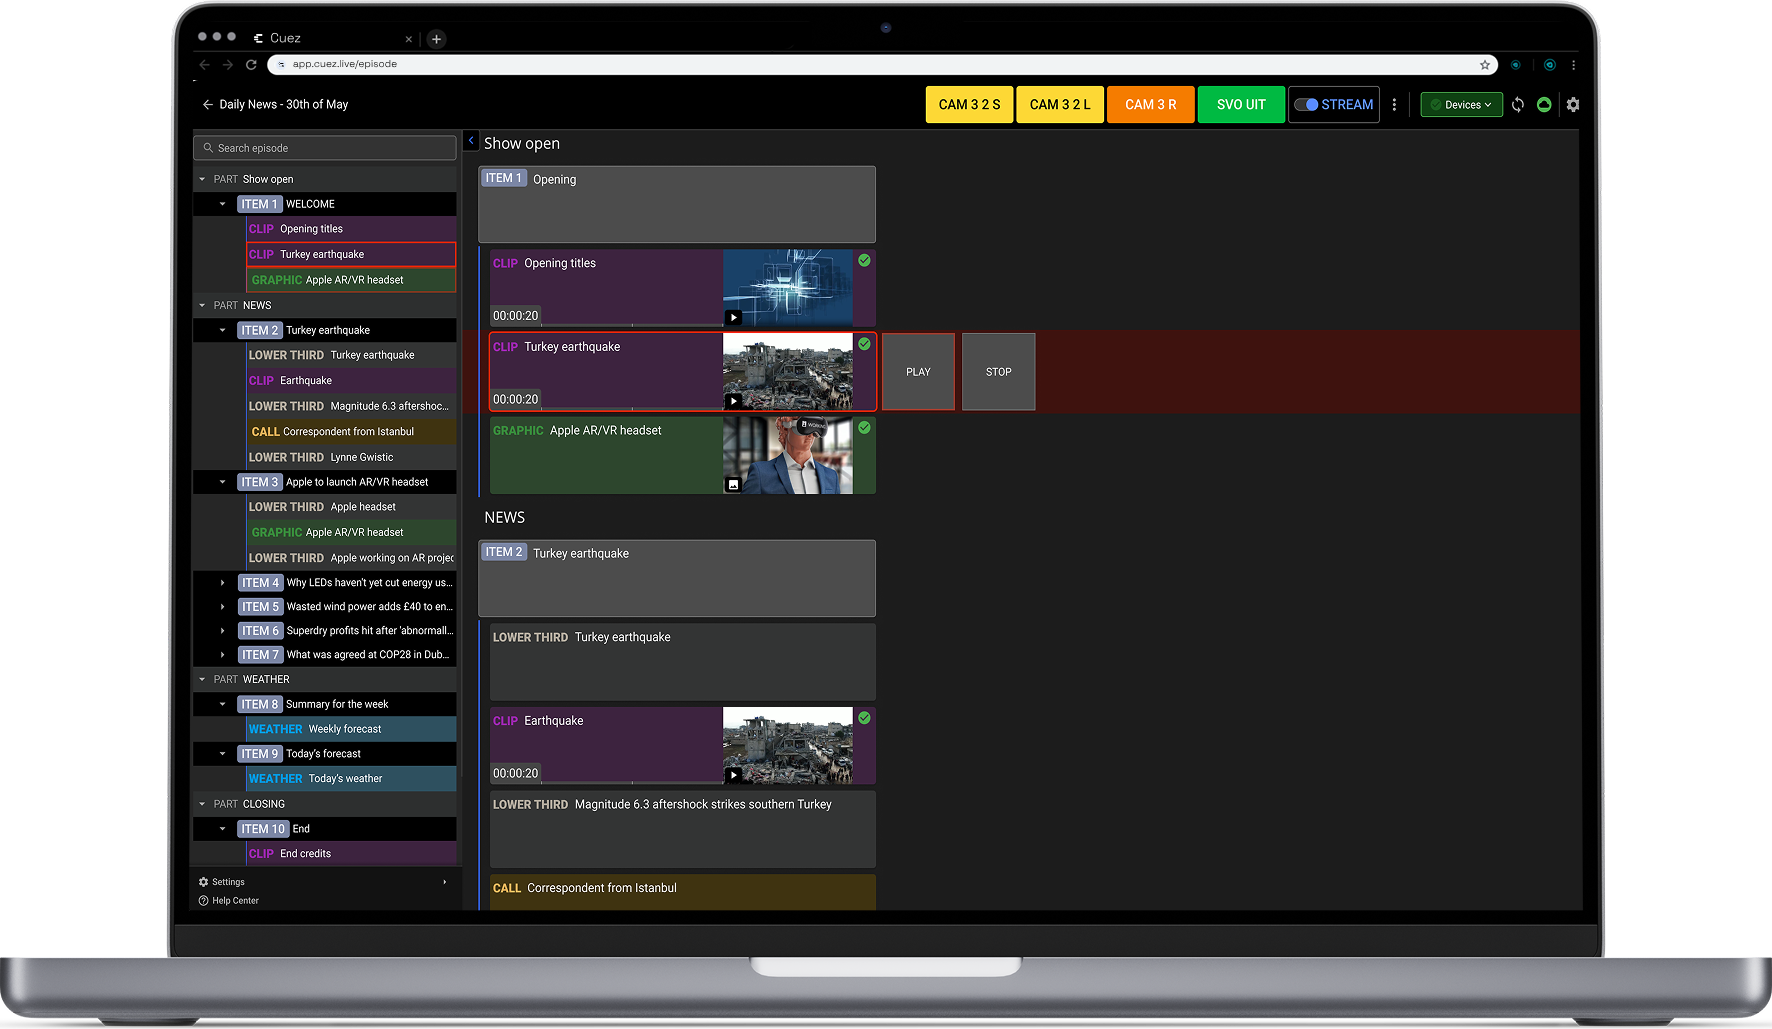
At it’s core Cuez is a cloud-based rundown software system. If you’ve worked in a newsroom, the Cuez interface will feel very familiar.
Most vMix users are used to running everything with a control surface. Buttons on a Streamdeck, xKeys, keyboard, whatever controller you like. When you first experience rundown driven automation, everything feels a lot different, even scary at first.
Cuez is split into 2 parts, the rundown app, and the Automator app. Many of you are probably familiar with rundown tools (even if you still use Google sheets). I’m not going to focus on the rundown part of the app, but I will say it is very intuitive and familiar.
Every show “Item” in the rundown is made up of items, parts, or cue blocks. Every producer will use these a bit differently, but it basically creates a 3-level hierarchy of items to build out a show.
All the usual timing tools and columns are there.
Let’s focus on what makes Cuez different….the magic is in the block configuration.

The 4 field types, Plain Text, Text Area, Label, and Media are where the automation magic begins.
My show: “Night Light”
My goal with automating the Night Light podcast was to make a show anyone can run, with little to no vMix experience. Here’s my setup:
[block diagram of Automator + vMix + controllers and controlled devices]
The basic setup is 90% vMix, with CasparCG to handle pre-rendered keyable graphics, and a single PTZ camera with several presets.
At it’s core this is a 2-4 person live podcast, with remote guests, some basics 2-box effects, dynamics lower3rd titles, and interstitial animations. This setup could easily be a newscast, or talk show.
This show has a combination of pre-scripted elements, and quite a bit of ad-libbing. I needed a way to make sure I can manually control the show when necessary, with my streamdeck, and also trigger the complex components like playback, timers and graphics.
Basic setup, 10 minutes to first trigger
Installing Automator was very simple. I simply logged into my Cuez account, downloaded the Automator app, and paired it with my project.
Setup time: 2 mins.
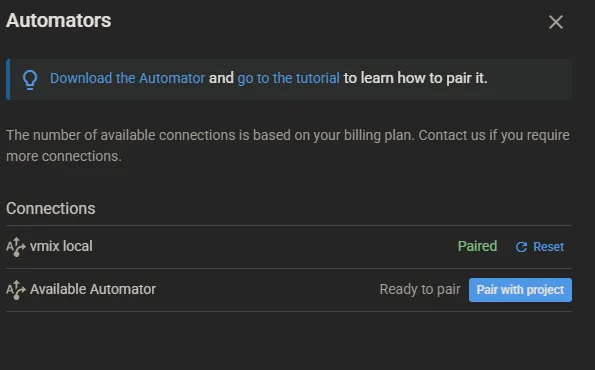
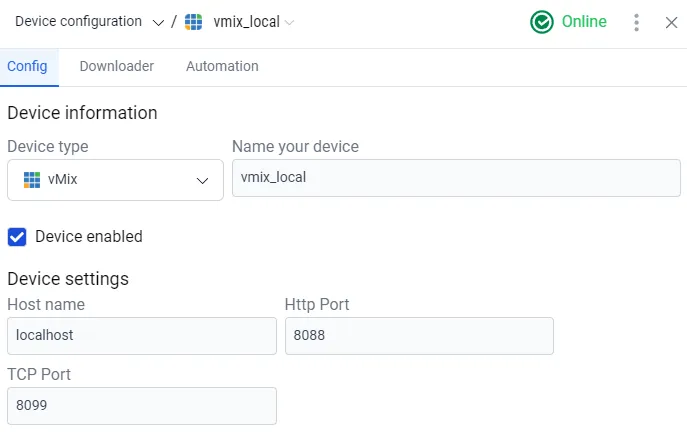
Once Automator is running, the next step[ was to pair my devices. In my case, I needed vMix, CasparCG, and my PTZ camera.
Device config was also simple. For this test, I simply chose the appropriate devices from the devices menu, entered the IP addresses and I was good to go.
Setup time: 5min
My final step was to handle media playback. And this is one of Automator’s killer features.
Before we get into the “this is not now our MOS newsroom system handles playback” debate…consider this:
Automator can (and does) handle all media management for you. Quickly. Without issue. For shows with a lot of playback elements, this is huge, and saves the show’s director a ton of headache. Media management was our single-biggest use of time, which doesn’t add anything to the production value of the show. Now with rundown and Automator, producers and editors can simply upload the media to the rundown itself, and you’re good to go. You’ll need a relatively fast internet connection for this, but if you’re live-streaming, I’m going to assume you have that part covered.
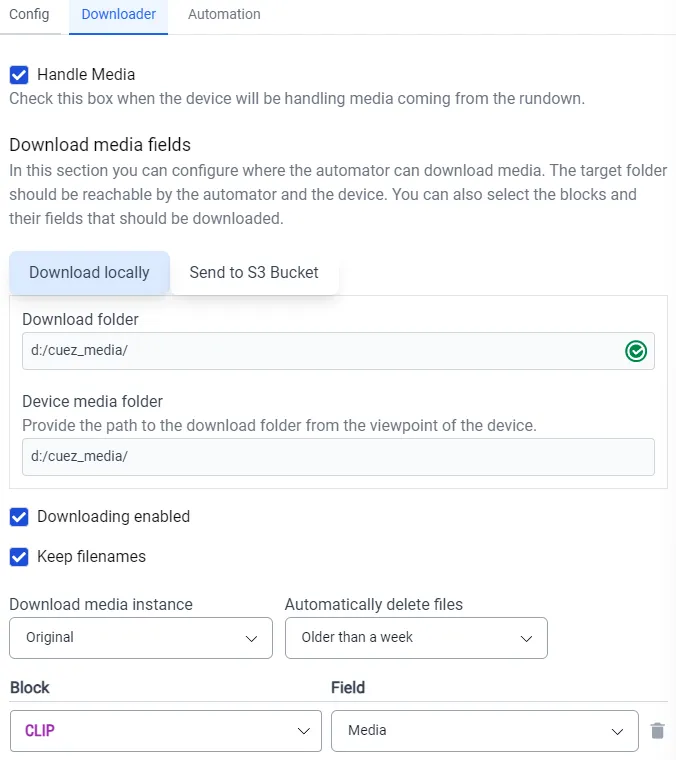
I should also mention, the Automator will handle media cleanup on it’s own. Just select how often you want it to delete old files, and you’ll never worry about filling up your drive again. This would have saved me many, many support calls in past years.
Now that my media was configured to download to a local drive, I was ready to build the show in vMix.
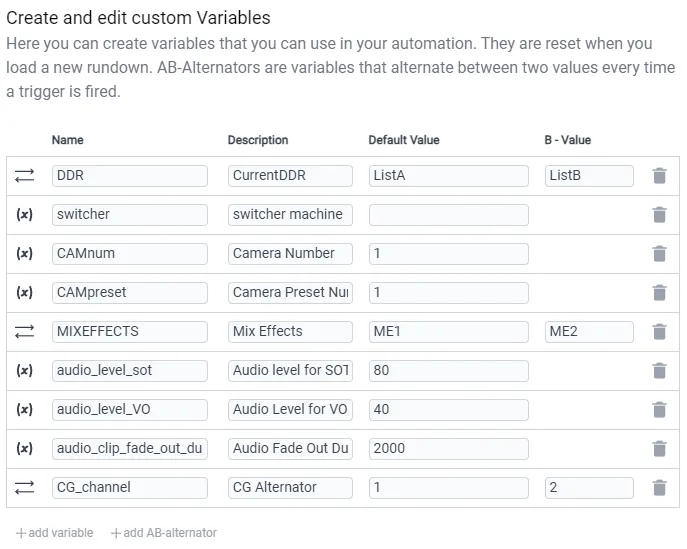
I like to keep vMix shows as simple as possible. In fact, I build them like I’m running a traditional switcher, 4 NDI inputs for my cameras or callers, 2 List inputs for playbacks, and an input for each 2-Box or box effect that I need. So how do I manage video playback so I don’t accidentally stop something that is on air? The secret is the A/B alternator variable in Automator.
The secret weapon: AB-Alternator variables
The setup mimics the playback setup of a traditional hardware control room: Playback A and B. In this case it’s al list input in vMix, ListA and ListB. This ensures no black frames or glitches like if you tried to load or change an on air list on the fly.
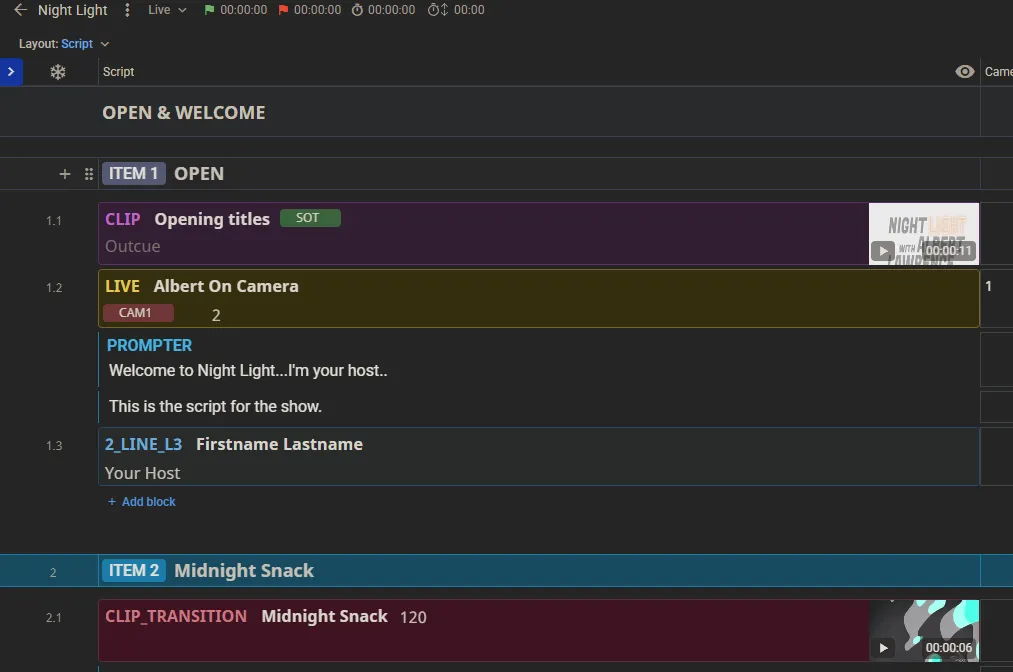
Now all I need to do is add the appropriate automation steps to make this all happen. So here are the basics:
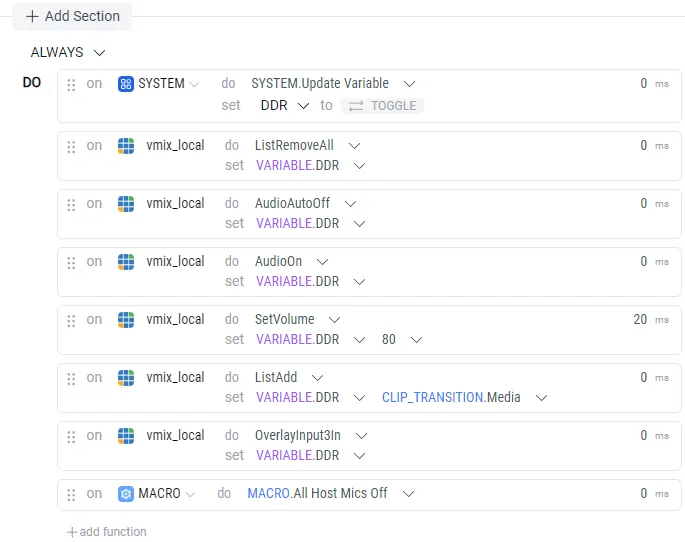
So, what are you looking at?
The first step is the magic. System.Update Variable.
This tells the Automator to toggle the DDR alternator variable from A to B or B to A. Now we will always be on the channel that is not on air. Next, it clears the list, and loads the media. Then we set the audio levels, turn on auto mix for the channel, wait a few milliseconds and play it on an overlay channel. Since this is a transition, we have one more piece of automation magic. Timecode listeners.
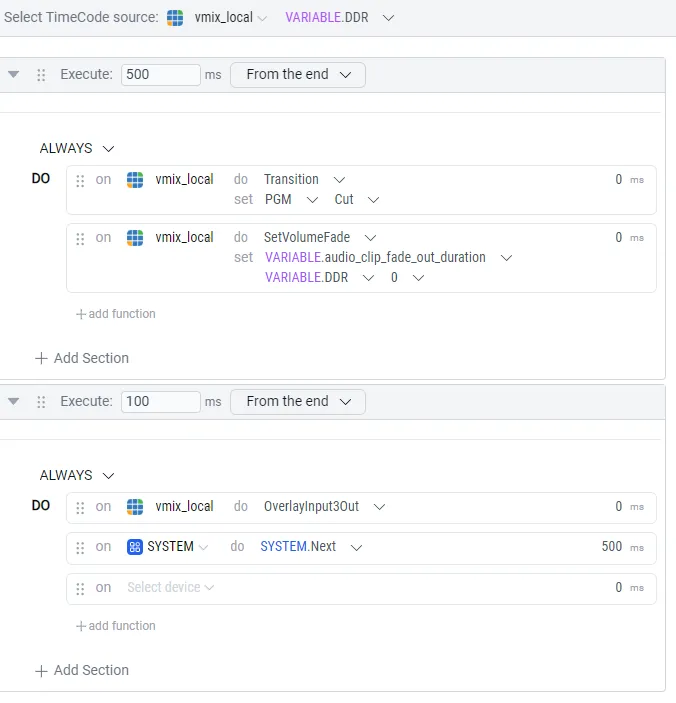
In the timecode tab, I can tell Automator to triggers events a set amount before the animation is over. This allows me to reuse this block over and over, regardless of the length of the clip. It will always play the clip and transition at the right time (because Automator knows how long the clip is)
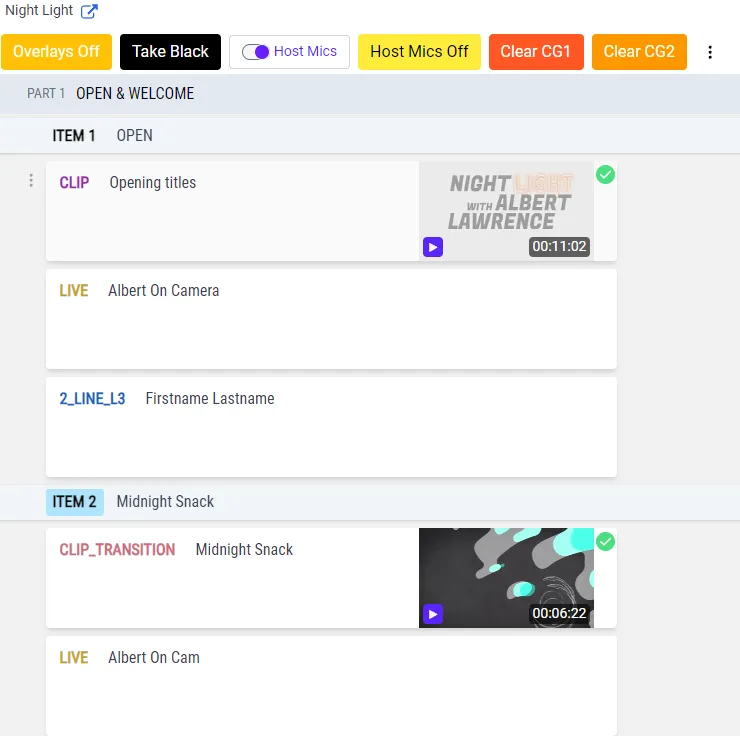
So, 500ms from the end, we tell vMix to cut to whatever is in preview, and fade out the Overlay. Simple and easy. You’ll never have to modify a transition macro again. Now we have seamless bumper transitions using one single clip block called “CLIP_TRANSITION.”
You’re going to notice a pattern in the next blocks I create.
The “LIVE” block is very simple. A Camera source, a host. Here’s where we get to use the rundown fields I mentioned earlier.
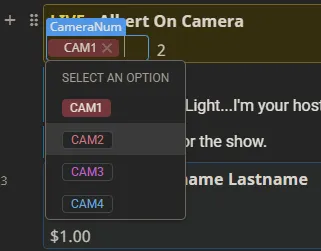
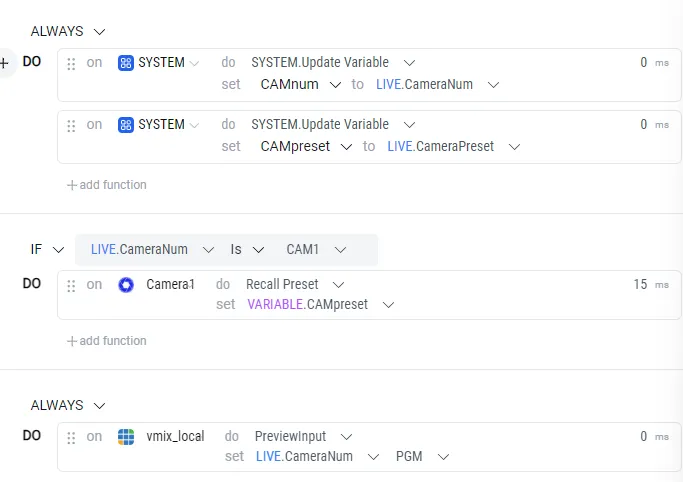
In my LIVE block, I created a custom field called CameraNum and added all my show’s cameras. These match up to camera numbers in vMix. I’ve also added an optional camera preset number. Now here’s what saves tons of time: I can set these, and reuse this live block for any camera and any preset, passing that info directly to the cameras with Automator.
So here’s what I’ve done. My PTZ cameras are not designed for on-air movement. When the LIVE block is up next in the rundown, I tell Automator to preset the camera and recall the preset. Now I can ensure the camera shot is correct before I take it to air.
That brings me to another concept of how I like to drive my shows.
Steps, Next, and Timecode: how I “drive”
I come from a live sports background, so I’m used to doing everything manually. I typically like to preset and cue everything, glance over quickly to make sure it’s correct, then take to air. I know not everyone works this way, but that’s how I like to run. Ask 10 directors and you’ll get 10 different answers on this. However, that’s the best part of Automator.
You can customize the automation to work the way you want to, at each step. There is On Cue, next, and blur (off air) automations that run triggers based on the on air status, and that’s a good thing. Another huge plus for Automator.
Manual Control, Sometimes
So now I now what you’re thinking. How do you handle the ad-libbed conversations between hosts?
I like to do this manually (although Automator can do audio-based camera switching if you like)
My 2BOX block shows how this is done.
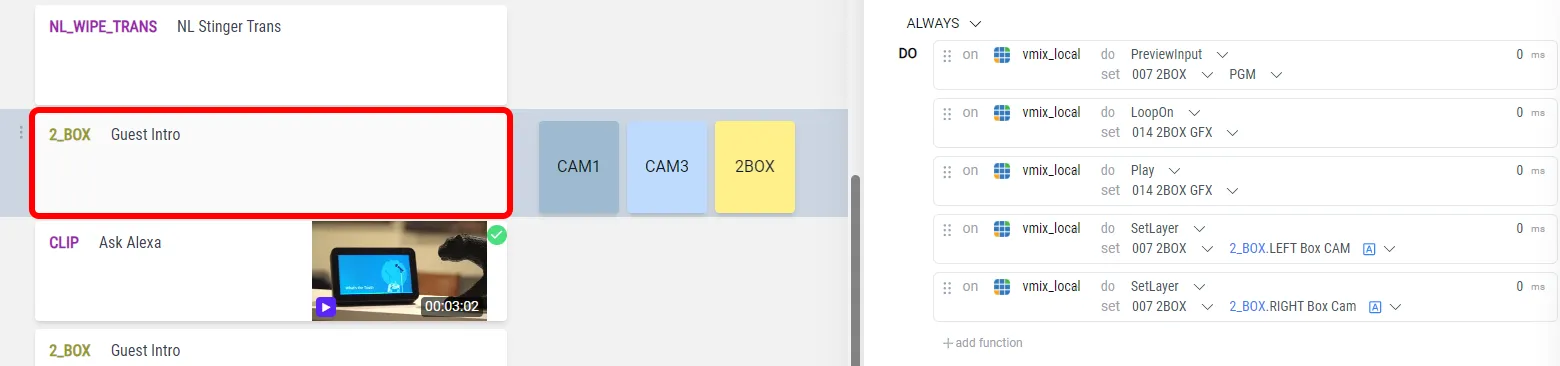
Another Automator feature I like, automatically setting the cameras in a 2BOX, and creating custom buttons with dynamic labels for manual camera switching. Once again, Automator Variables to the rescue. I can set the cameras needed for this effect from the rundown itself, and Automator handles the rest .
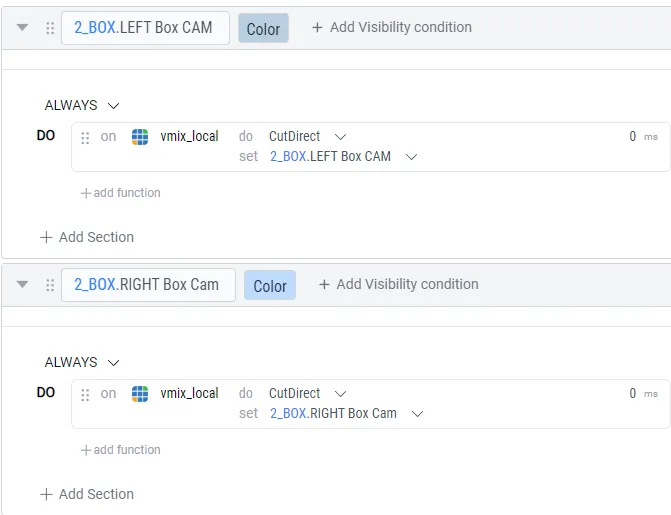
When the effect is on air, I have 3 buttons, one for the Box and each camera involved, so that the director can follow the conversation. This is huge bonus for combining automation with manual control.
Graphics
Finally graphics. How do we keep all the complexity of data sources and GT Titles away from producers? Simple, just populate the templates from the rundown. I’ve solved that by creating a separate block for each graphic template in vMix. The magic happens when you add data fields to the rundown block.

Directly from the rundown, I created the 3 fields needed to populate the graphic. Now this data is passed directly to the Automator and displayed on the graphic. No additional data source needed. For our podcast, this is a huge time saver. Producers can simply enter the info in one place, and have it follow anywhere in the live show. For simple template driven graphics, this is a huge time saver.
So far, I’ve automated almost all the elements I need to run my podcast live. Let’s compare this to my previous workflow.
3 Hours before the show the director would login, and open vMix. Then they would need to do the following:
- Open the rundown and spend 10-20 minutes studying the show for any gotchas or new elements
- Open vMix and clean up all assets from previous shows - 2-3mins
- Download all new show assets from a shared drive to the local vMix machine - 5-10 mins
- Load all the new assets in the 2 lists, and arrange the files based on rundown - 10-15 mins
- Build Macros or buttons to run any new show effects - 30mins - 1hr
With Automator, we can eliminate steps 2,3,4, and potentially 5, saving at least one hour of prep time.
Now all a director has to do is login, study the rundown, and tweak any automation or blocks to make them easier to execute.
That’s it. The rundown becomes the single source of truth, and everything stays updated. This is something I truly wish I had when directing this show.
Control surface options (Bonus)
Now, we need to control everything with buttons, because who doesn’t love buttons?
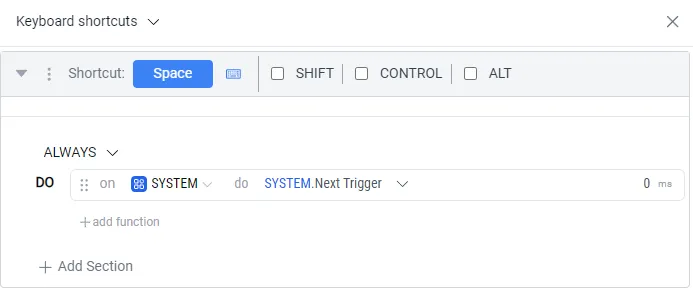
Creating keyboard shortcuts is dead simple. Add a shortcut, press a key, then tell it what to do. I simple created a next shortcut and attached it to the spacebar.
I love my Streamdeck, and you’ll see it on almost any show that I work (even the big shows with big production switchers)
So naturally, I wanted buttons to advance through my Automator triggers. Thankfully Cuez makes this simple with their Streamdeck plugin.
I was able to create PREV and NEXT buttons to advance through the rundown with the familiar tactile feel of a Streamdeck.

Now, I had the best of both worlds, automation to handle the heavy lifting, and familiar Streamdeck keys for manual control and cutting cameras in reaction to the hosts and guests.
What this solves (newscast or podcast)
Here’s my take. Automator saves time. When setup for your productions, with your workflow in mind, it will absolutely save precious of prep work every single show. Automator makes live far more predictable…and that matters. Instead of spending hours prepping for a podcast or newscast, now your team can focus on the content itself, and react in real time.
Four our Night Light podcast, this would have saved us hours of pre-rendering product graphics, name graphics and anything else that could be templated.
The biggest advantage isn’t even the automation itself, but the fact that there is minimal setup. Login, install Automator, and that’s it. No complicated servers, no frustration, just productivity. For remote teams, this is the killer feature.
Wrap + CTA
If you want to dive in further check out my upcoming YouTube walkthrough of this entire setup.
Check out the Youtube Video here
When you’re ready to give Automator and Cuez a test drive…Check it out here.